Sharing state down the DOM
Sharing state in a component based framework is a common task. Every application I have ever build requested a list of data from a JSON-API and rendered each item by sharing its data with a child component.
The React way
Passing data down the DOM from the parent to a child component, is encouraged to be done using component properties. (see Sharing State Between Components)
 1// TitleList.jsx
 2import { useState } from "react";
 3
 4function Title({ title }) {
 5  return <span>{title}</span>;
 6}
 7
 8export default function TitleList() {
 9  const [titles, updateTitles] = useState(["title1", "title2", "title3"]);
10  return (
11    <div>
12      {titles.map((t) => (
13        <Title key={t} title={t} />
14      ))}
15    </div>
16  );
17}
Using react one can simply define a component named Title accepting a
singular argument called title. This component is then used to render the
list of titles by mapping over all values and passing the current title to the
children via the title property.
Modifying the list of titles can be done by invoking the updateTitles and
spreading the previous values as well as the new value into a new array:
 1// TitleList.jsx
 2import { useState } from "react";
 3
 4function Title({ title }) {
 5  return <span>{title}</span>;
 6}
 7
 8export default function TitleList() {
 9  const [titles, setTitles] = useState(["title1", "title2", "title3"]);
10  const [newTitle, setNewTitle] = useState("");
11  return (
12    <>
13      <div>
14        {titles.map((t) => (
15          <Title key={t} title={t} />
16        ))}
17      </div>
18      <input
19        type="text"
20        placeholder="new title"
21        onChange={(event) => setNewTitle(event.target.value)}
22      />
23      <button onClick={() => setTitles([...titles, newTitle])}>Add</button>
24    </>
25  );
26}
How Vue.js does it
Using Vue.js the example can be written slightly more concise and intuitive:
 1// Title.vue
 2<script setup lang="ts">
 3const props = defineProps<{ title: string }>();
 4</script>
 5<template>
 6  <span>{{ title }}</span>
 7</template>
 8
 9// TitleList.vue
10<script setup lang="ts">
11import { ref } = from "vue";
12import Title from "./Title.vue";
13
14const titles = ref<Array<string>>([]);
15const newTitle = ref<string>("");
16</script>
17<template>
18  <div>
19    <Title v-for="t in titles" :title="t" />
20  </div>
21  <input type="text" placeholder="new title" v-model="newTitle" />
22  <button @click="titles.push(newTitle)">Add</button>
23</template>
This is logically the same, vue does however allow for direct state
modification- thus omitting the need for allocating a new array each time we
add a new title via the spread syntax ([...prevElements, newElement]).
Sharing state up the DOM
Here up the DOM refers to children modifying and sharing these updates with their parents. Doing so directly is often not possible or discouraged by frameworks such as React.js (However react doesn’t even allow direct modification of state inside the current component).
React.js - Passing functions
When using React the parent often passes a function in which the parents state is modified to the children via a prop:
 1import { useState } from "react";
 2
 3function Title({ title, deleteFunction }) {
 4  return (
 5    <div>
 6      <span>{title}</span>
 7      <button onClick={() => deleteFunction(title)}>Delete</button>
 8    </div>
 9  );
10}
11
12export default function TitleList() {
13  const [titles, updateTitles] = useState(["title1", "title2", "title3"]);
14  const [newTitle, setNewTitle] = useState("");
15  function deleteByTitle(title) {
16    updateTitles(titles.filter((t) => t !== title));
17  }
18  return (
19    <>
20      <div>
21        {titles.map((t) => (
22          <Title key={t} title={t} deleteFunction={deleteByTitle} />
23        ))}
24      </div>
25      <input
26        type="text"
27        placeholder="new title"
28        onChange={(event) => setNewTitle(event.target.value)}
29      />
30      <button onClick={() => updateTitles([...titles, newTitle])}>Add</button>
31    </>
32  );
33}
The above example can be played with and ran here:
Vue.js - emitting events
In the vue world we define a set of events we want to emit in the child component, the parent component is then able to listen to these events and act on them. (See Event Handling)
 1// Title.vue
 2<script setup lang="ts">
 3const props = defineProps<{ title: string }>();
 4const emit = defineEmits(["delete"])
 5</script>
 6<template>
 7  <span>{{ title }}</span>
 8  <button @click="emit('delete')">Delete</button>
 9</template>
10
11// TitleList.vue
12<script setup lang="ts">
13import { ref } from "vue";
14import Title from "./Title.vue";
15const titles = ref<Array<string>>([]);
16const newTitle = ref<string>("");
17</script>
18<template>
19  <div>
20    <Title
21        v-for="t in titles"
22        :title="t"
23        @delete="titles = titles.filter((title) => t !== title)" />
24  </div>
25  <input type="text" placeholder="new title" v-model="newTitle" />
26  <button @click="titles.push(newTitle)">Add</button>
27</template>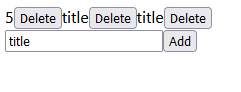
Event listeners and emitting events is a powerful tool for simplified state management and I use both a lot when developing with Vue.js.
Real world example
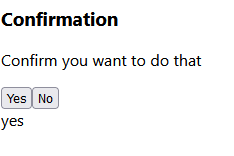
One can build components such as modals and confirmation prompts with custom events and the ability to react to actions taken by the user. Lets now take a look at one such example of a customisable modal:
 1// Modal.vue
 2<script setup lang="ts">
 3const props = defineProps<{
 4    title: string;
 5    description: string;
 6    events: Array<{ title: string; name: string }>;
 7}>();
 8const emit = defineEmits();
 9</script>
10<template>
11    <div>
12        <h3>{{ title }}</h3>
13        <p>{{ description }}</p>
14    </div>
15    <div>
16        <button
17            v-for="event in events"
18            @click="emit(event.name)"
19        >
20        {{ event.title }}
21        </button>
22    </div>
23</template>
24
25// App.vue
26<script setup>
27import {ref} from "vue";
28import Modal from "./Modal.vue";
29const eventOutput = ref("");
30</script>
31
32<template>
33  <Modal
34    title="Confirmation"
35    description="Confirm you want to do that"
36    :events="[
37        {title: 'Yes', name: 'yes'},
38        {title: 'No', name: 'no'}
39        ]"
40    @yes="eventOutput = 'yes'"
41    @no="eventOutput = 'no'"
42    />
43    <span>{{ eventOutput }}</span>
44</template>
Clicking one of the generated buttons changes the
eventOutput value to either yes or no: